In this tutorial, we’re going to create a .Net Core application that will act as a reverse proxy forwarding requests to one or more swagger-supported API endpoints. You will find the source code for this tutorial here: SOURCE
The Problem
There are many cases where you require to forward requests to one or more endpoints, for example:
- You want a client application to communicate with a single REST endpoint
- You want to seamlessly combine multiple APIs behind a single API gateway
- You want to transform requests/responses of your backend endpoints
- You want to provide your developers and client consumers with a single Swagger UI interface that will allow them to browse and test the different backend APIs from within your proxy server
- You don’t have access to the source code of any these backend API endpoints
- You are running into CORS issues and same-origin policies when calling the endpoint from a client application
Side note: you can solve all these problems and more using an API management instance (APIM) on Azure or check out “Implement API Management” of my AZ 204 course 😊
The Solution
We’re going to create a proxy that will intercept any incoming request and forward it to our backend. What this interceptor will do is it will simply clone the incoming request and any headers as well as request bodies and create an HTTP request/response to the foreign endpoint.
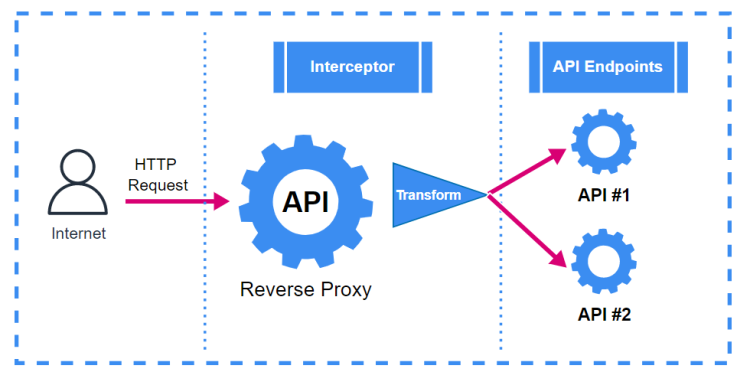
Briefly speaking, when we send a request to the proxy, we will implement something like the below diagram:

- Receive an HTTP request from a client under our proxy host (localhost/v1/pet/1)
- Note: We will need to modify our backend swagger headers and add a new header called “X-SOURCE” in order to be able to route it to the correct backend endpoint
- The reverse proxy will check the header value of “X-SOURCE” to be “API #1” and will route the request to API #1. In addition the following operations will be done:
- Copy the request URI
- Copy the body of the request in case It’s not empty
- Copy the request headers
For the response operation, we can implement something similar to the below diagram:

- Receive the response from the backend
- Optionally tranform the response. Example, convert it to XML or remove request origin header
The Requirements
For this solution, we will need to use the below frameworks and tools:
- .Net Core 6
- Newtonsoft
- Swashbuckle

We need to create a new .Net core 6 web api solution, below screenshots are what I used for this project:


Since we’re going to customize swagger, we will need to point to “/index.html” instead of “/swagger/index.html” during startup of the application. We can do this by going to properties > Debug > Open Debug launch profiles UI:

Scroll and remove “swagger” from the Url field, this will launch the application without “/swagger/”. In this case the launched url will be localhost:5255/index.html

The Implementation
Let’s go over the implementation of this proxy starting with the project structure:

- BackendController.cs: This will contain all of our backend api definitions. This controller will return the swagger.json schema for each backend endpoint
- DefaultController.cs: This will contain any custom actions or methods that you can add- in addition to your backend Apis
- InterceptorHandler.cs: This is the middleware responsible for routing incoming requests to the proper backend endpoint
- ProxyHandler.cs: This helper class will allow us to create or copy HTTP requests
- Model Folder: A few model classes to help us in deserialization operations.
- Program.cs: Where we add the interceptor middleware and configure swagger
Program.cs
We need to make the below changes in the program.cs file

- We need to register the settings related to the endpoints from the appsettings.json so that they can be used throughout the application. You can configure additional endpoints in the appsettings.json similar to the below screenshot

2.In step 2, we will loop over the endpoint definitons and add them in SwaggerUI, we can also add additional endpoints like the Default endpoint of the proxy
3. We then register the middleware that will intercept the incoming requests
BackendController.cs
In this class, we can list the endpoints as actions. We also injected the HTTP client instance as well as the endpoint configurations in order to use them in this controller.

In the screenshot below, we fetched the swagger url from the injected configurations (In this example we are using https://petstore.swagger.io/v2/swagger.json)
We changed the host from “petstore.swagger.io” to the host of the Request. In this case, It’s going to be the host of our proxy “localhost:port” .

Then we set the supported schemes (http, https). We’re not using https so we will only add http protocol using the “Request.Scheme” property.

Finally, we will modify the swagger schema and add a new header property called “X-SOURCE”, this is going to help us identify which endpoint is this request coming from.

This is going to create a default header with the value of the endpoint name in the swagger UI page.
InterceptorHandler.cs
Since we registered the interceptor as a middleware in the application startup, the Invoke method in this class will be called for any incoming request.
We can then check if there’s a header value set for the “X-SOURCE” key and use our ProxyHandler helper to copy the HTTP request with all its header and body values and return the copied response we receive from the backend to the client side.

ProxyHandler.cs
The proxy handler will help us create and copy HTTP requests and responses. It’s essentially a helper class that handles cloning HTTPContext inputs, headers and body objects. We won’t go into the details of the implementation for this handler, but let me know in the comments if you want explanation for this part.

Running The Application
Try running the application and you will notice that we have three endpoints configured “Default”, “Endpoint1” and “Endpoint2”.
We can see in this video that the default controller is working fine.
We can also see that we can add a new pet and retrieve it using the same proxy endpoint (Example: getting a pet http://localhost:5255/v2/pet), remember that we’re not hitting the backend apis from the browser, everything is routed using the interceptor.
The Conclusion
We have created a reverse proxy that can consume swagger endpoints. Our developers or clients can browse the swagger interface seamlessly, test the different backend actions using a single entry point.
The reverse proxy enabled us to:
✔️Provide a single entry point for our clients to use
✔️Provide a unified UI interface to test the backend actions
✔️Provided us an easy way to apply request/response transformations like converting to XML/Json, cleaning the response before sending it etc…
Next Step
There are many ways we can improve our reverse proxy. For example, we can add throttling behavior to prevent DDOS attacks, or implement load balancing behavior in case one of our backend was not responding.
We can also rewrite the Backend controller in a generic way so that It can accept additional enpoints without creating an action for each endpoint.
And that’s It for this blog post, you can find the soure code here
References: Building a Reverse Proxy in .NET Core
Hilal that’s a lovely tutorial, can I ask, can this run with HTTPS?
Also could I host the middleware proxy in IIS?
Could I use the middleware proxy to service some client requests and only forward certain client requests to the other backend/microservices?
Yes of course you can run this on HTTPS, just update your endpoints to use https as well as your app, you can also host the middleware as an API in IIS exposing one entry point – the app’s url. As for the last question, you need to implement some routing logic in the middleware, so it involves coding the logic to handle forwarding to other backend services