
- “Hey Alexa”
- “Yes, daddy 🤓”
- “Add milk to my cart”
- “Milk added to your cart 🤓“
Ever wonder how Google Assistant, Amazon’s Alexa, and Apple’s Siri seamlessly understand what you’re saying and even respond with actions? These tools are using something called automatic speech recognition or ASR.
In this tutorial, we will briefly explain what automatic speech recognition is and get started with a simple way to automatically transcribe an English-speaking audio file to text using the Speech Recognition library. Skip to the tutorial here.
What is Automatic Speech Recognition?
Automatic speech recognition (ASR) is the recognition and translation of spoken words into text. Despite being sometimes mistaken with voice recognition, speech recognition focuses only on converting speech from a verbal to a written format, whereas voice recognition simply aims to recognize the voice of a certain person. A typical ASR system converts spoken language into readable text using machine learning or artificial intelligence (AI) technologies. ASR systems are evaluated on their accuracy rate, i.e. word error rate (WER), and speed. Pronunciation, accent, pitch, amplitude, and background noise are all characteristics that might affect word error rates.
How a Speech Recognition System Works
The figure shows the block diagram of a typical ASR system.

In a typical speech recognition system, the first step is feature extraction from the input speech. Feature extraction involves applying various signal processing techniques to enhance the quality of the input signal and transform input audio from the time domain to the frequency domain.
Acoustic feature extraction, the acoustic model, and the language model are all part of automatic speech recognition (ASR). Speech recognition relies heavily on the extraction and identification of acoustic features. The extraction and identification of the acoustic feature include information compression and signal de-convolution procedures.
Based on the features extracted, a set of acoustic observations X is generated given a sequence of words W. The speech recognizer then estimates “the most likely word sequence W* for given acoustic observations based on a set of parameters of the underlying model”.
The acoustic model calculates syllable probability from speech. In voice recognition, the acoustic model generally uses a hidden Markov model (HMM). The acoustic model’s task is to predict which sound or phoneme is pronounced at each speech segment.
The language model calculates word probability from speech, which is divided into a statistical model and a rule model. N-gram is a basic and efficient statistical language model that is extensively used. It employs a probability statistic to reveal the inner statistic regulars.
Speech Recognition Tools and Libraries
There are several speech recognition toolkits and libraries that one can use to build speech recognition systems. Some of the famous toolkits are CMU Sphinx, Kaldi, Julius, and HTK. Installing a voice recognition package for Python is required in order to conduct speech recognition in Python.
A variety of python speech recognition packages are available online, for example, apiai, SpeechRecognition, Google-cloud-speech, pocketsphinx and watson-developer-cloud.
| Package Name | Features |
| apiai | – Simple Speech Recognition. – Voice Activity Detection. – Natural Language Processing. |
| SpeechRecognition | – Support for Several Engines and APIs, Online and Offline. – Easy to Use. – Microphone Accessibility. |
| Google-cloud-speech | – Offers Simple Speech-to-Text API service. – Easy Integration into Developer Applications. |
| pocketsphinx | – Lightweight Speech Recognition Engine. – Supports Continuous Speech Recognition. |
| watson-developer-cloud | – Artificial Intelligence Enabled API – Simple to Develop, Debug, Execute, and Deploy APIs. – Basic Speech Recognition Tasks. |
Although some of these tools offer integrated capabilities that go beyond simple voice recognition, such as natural language processing for determining a speaker’s intent, others emphasize only on the conversion of speech to text.
SpeechRecognition is one tool that stands out because it is easy to use for a beginner and has compatibility with many available speech recognition APIs. SpeechRecognition makes it very simple to retrieve the audio input needed to recognize speech. It can work offline as well. This is why for the simplicity of this tutorial, we will be using SpeechRecognition.
Set up a Speech Recognition Project using Python SpeechRecognition Library
Prerequisites
- Python is required and python versions 2 and 3 are all compatible with SpeechRecognition, although Python 2 installation involves some extra procedures. We will be using python 3.3+ for this tutorial.
- PyAudio is required if you want to use the microphone input.
- PocketSphinx is required only if you need to use the Sphinx recognizer
- Google API Client Library for Python is required only if you need to use the Google Cloud Speech API.
- FLAC encoder is required only if the system is not x86-based Windows/Linux/OS X.
Installations
For this project, we will show how to set up a speech recognition project for two different environments, Windows and Linux. For windows, we will use Visual Studio, or you can use any other Python IDE. For Linux (Ubuntu 20.04), we do not need any IDE.
On Ubuntu, use the following command to install the SpeechRecogntion library in your terminal window:
pip install SpeechRecognition
On Windows, install and open Visual Studio and select the option “Create a new project” and then choose the python Application. You are now ready to start development and download the necessary packages.

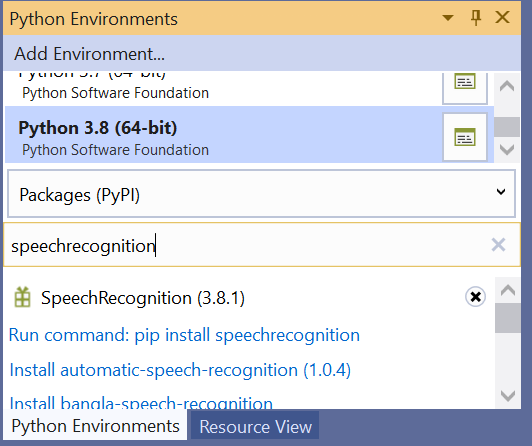
Select the View > Other Windows > Python Environments menu command.
From the Python Environments window, select the default environment for new Python projects and choose the Packages tab.
Install speechrecognition by entering its name into the search field and then selecting the Run command: pip install speechrecognition option. Running the command will install speechrecognition, and any packages it depends on.
Example Source Code
Next, the code will be same for both Windows and Ubuntu.
There are several classes in the SpeechRecognition library, but we’ll be concentrating on one called Recognizer class. Now we will learn how to convert audio files into text.
Let’s import the library first and then access the Recognizer class.
import speech_recognition as sr
Next, define a variable and, by invoking it, assign an instance of the recognizer class to it.
recognizer = sr.Recognizer()
Consider the energy threshold to be the loudness of the audio files. Values less than the threshold are declared silent, whereas values more than the threshold are considered speech. When working with an audio file, the energy_threshold setting will help us detect speech above certain decibels.
The documentation for SpeechRecognition recommends 300 as a threshold setting that works well with most audio files. Remember that the energy threshold value will automatically vary when the recognizer listens to audio files.
recognizer.energy_threshold = 300
Each Recognizer function provides seven methods for speech recognition from an audio source, each of which uses a different API. They are as follows:
- Google Web Speech API: recognize google()
- Microsoft Bing Speech: recognize bing()
- Houndify by SoundHound: recognize houndify()
- CMU Sphinx – requires PocketSphinx: recognize sphinx()
- IBM Speech to Text: recognize_ibm()
Only recognize sphinx() works with the CMU Sphinx engine offline. The remaining four require an online connection.
The Google Recognizer function, recognize_google(), will be used in this example. It is free to use and does not require an API key. Other APIs each require authentication with either an API key or a username/password combination.
But, there is one disadvantage to using this recognizer: it restricts your ability to work with larger audio files. However, you will have no problems dealing with audio files under 5 minutes in my experience. It is not recommended to use this recognizer on lengthy audio files.
recognizer.recognize_google()
All Recognizer class recognize_*() functions require an audio data argument. In each case, audio data must be an instance of the AudioData class from SpeechRecognition. A preprocessing step is required for better recognition of speech. Consider it similar to the data preprocessing that we do before doing data analysis.
SpeechRecognition currently supports the following file formats:
- WAV: PCM/LPCM format is required.
- AIFF
- AIFF-C
- FLAC: the format must be native FLAC. The format OGG-FLAC is not supported.
If you’re using x-86-based Linux, macOS, or Windows, you should have no trouble dealing with FLAC files. Other platforms will require you to install a FLAC encoder and have access to the flac command line tool. We will be using a WAV file (male.WAV) for this tutorial. You can also download this from the link below.
An AudioData instance may be created in two ways: from an audio file or from sounds recorded with a microphone. Let’s start with audio files, which are a bit easier to get started with.
audio_file = sr.AudioFile(“male.wav”)
Although the recognize function takes audio_data, the current variable type is audio_file. We’ll use the recognizer class’s built-in record function to convert it to an audio data format.
with audio_file as source:
  audio_file = recognizer.record(source)
  recognizer.recognize_google(audio_data=audio_file)
The context manager examines the file’s contents and stores it in an AudioFile instance named source. The data from the full file is then recorded into an AudioData object via the record() function. You may confirm this by looking at the audio_file type:
type(audio_file)
You can now call the recognize google() to try to identify any speech in the audio file. Depending on the speed of your internet connection, you may have to wait a few seconds before viewing the result.
Here is the complete code you can copy and paste, and run on your computer using python 3, don’t forget to place the audio file in the same directory as your python file.
Name the file speech.py and run using the command python3 speech.py
# -*- coding: utf-8 -*-

import speech_recognition as sr
recognizer = sr.Recognizer()
recognizer.energy_threshold = 300
audio_file = sr.AudioFile("male.wav")
with audio_file as source:
  audio_file = recognizer.record(source)
type(audio_file)
result = recognizer.recognize_google(audio_data=audio_file, language="en-US")

print (result)
Conclusion
In this tutorial, you learned what speech recognition is and how it works. You also explored several speech recognition packages, as well as their applications and installation procedures. You then used Speech Recognition, a Python library, to transform speech to text using a WAV audio file
We hope that this tutorial has helped you learn the fundamentals of Speech Recognition.